Friday, November 29, 2013

Inexpensive Ideas for Christmas Porch Decor

Here is the finished project.
I like to decorate using my flower pots.
Happy "Black Friday" all! (As you can see, I am not out shopping today. Don't get me wrong, I love to shop, but standing in lines, crowds of people fighting over a $20 item, getting trampled is just not my style. You could say I'm a little claustrophobic too! (If any of you love the "Black Friday" thing, good for you! It's just not for me.) So I spent today at home with my family, eating left-overs (lots of pie), taking down Fall decorations and getting started on my Christmas décor. My mama has been here for the Holiday and we always love to have her! She's fun and oh so creative! She helped me get a start on my porch décor. We decided that you don't have to spend a lot of money to decorate creatively and uniquely. Today we used branches cut from my Pine trees in my yard, my daughters collected Pinecones and Acorns from our trees and I had some cheap greenery and poinsettia branches from Wal-Mart (they were like $3, I'm sure you could get some from the Dollar Store just the same only cheaper!) I had some leftover Gold Metallic Spray Paint. We spray painted the pinecones and acorns and some of the Pine greenery. I think I may be addicted to Gold Spray Paint. "Hello, my name is Kacey and I'm addicted to decorating with Metallic Gold Spray Paint!" (I promise I'm not huffing!) But, I may need a 12 step program because I can't stop using it to decorate! (There are worse things right?!) Ever since I used it to spray my pumpkins at Halloween I have been hooked, and it's carrying on into Christmas! My mom had the great idea to create a real Pine greenery garland along my brick ledge. One by one, she placed the short branches in between the siding and the metal piece that connects the siding to the brick. (Worked like a charm and I think it looks great!) She's a genius, I'm telling you! Here is a look at the beginning of our Christmas Porch Décor. It's not completed yet, but we'll give you some ideas and a first glance. We spent very little on what we have here! The wreath was made of old jeans. The Pine boughs, Pinecones and Acorns were free (from my yard) and I think I spent about $10 on the faux greenery boughs from Wal-Mart. And the spray paint and red ribbons I had left over from another project. The Gold Star hanging in my window used to be black. I found it laying on the ground out on the farm and decided to give it a new life (the West Mountain wind must have picked it up off the shed and blewn it away!)
Here's a look at the beginning of my Christmas porch décor:
Here's my denim jean wreath going from Fall to Christmas.

Spraying pinecones and getting my nails painted at the same time. (I don't recommend this method of nail painting, it's a little sloppy!) I really should wear gloves.
This middle pot was compliments of my 8 year old. I just added the Poinsettias.


Here we sprayed the entire branch with the Gold Spray Paint and used some faux greenery.
Here is a close-up of our Sprayed Pinecones and the faux Poinsettias.

Here's a close-up of a sprayed Acorn.
 
Here is the old Star prior to it's new Spray Paint job!
The "after", I like it Gold!
Here was Mom's real Pine house garland.
 
A close -up of her garland.

Wednesday, November 27, 2013

Recipe Share: Pineapple Stuffing, the perfect Thanksgiving Side Dish

Hi my good friends! I can't believe tomorrow is Thanksgiving! It seems that this year is just flying by! (anyone agree?) Even though I can't believe it's here already, I love, love Thanksgiving. This time of year is just heaven to me. I get to enjoy time with my family and friends. Cook and bake great food. And remember and be thankful for all the blessings which are mine! I am hosting the big dinner tomorrow for some of my family and I really love to cook this meal! (Even though it takes the better part of 3 days to prepare, I really do enjoy cooking this meal!) As I was preparing some of my side dishes today, I thought I'd share a family recipe with you. I am not a big stuffing fan. Giblets and Gizzards just gross me out! I really used to prefer Stove Top (I know!) to all the other home-made stuffings or dressings I had experienced. That was until one of my lovely cousins brought this "Pineapple Stuffing" to our annual Family Thanksgiving dinner! When I tried it, I was in love! It's a humble appearing recipe and photo, but don't let that fool you. It's a bread stuffing, but it's sweet and could totally pass as a dessert! It's warm, buttery, gooey...yet crispy and did I say sweet?! She shared this recipe many years ago, but we all still insist that she bring it every year! Thanks Candice for sharing this deliciousness with us. (And you are all welcome that I'm sharing it with you! Just kidding, but really I think you will love it!) So if you need another side dish on your menu, feel in need of great comfort food, or if you just don't like traditional stuffing (like me!), forget the Stove Top and try this instead!! And it tastes even better the 2nd and 3rd day, so enjoy those left-overs too. (Just re-heat in oven on 350 degrees for about 1/2 hr.) The ultimate in comfort food ladies and gentlemen!! Some folks say it reminds them of bread pudding, some say dressing, I say delicious no matter what you call it!!

Here's what you will need:
1/2 Cup Butter, salted
4 Eggs, beaten
5 Slices of bread, cut into cubes
1 15oz Can Crushed Pineapple, drained (When I double the recipe I use one can crushed and one can of chunked pineapple, because I like a few chunks.)
dash salt

Directions:
Grease pan. (Doubled recipe fills a 9x13) Cut bread slices into cubes and place in greased pan. Set aside. Cream butter and sugar together in mixer until smooth. Beat in eggs and drained pineapple. add dash salt.Then pour mixture over cubed bread. Bake at 350 degrees for 1 hour.


Tuesday, November 26, 2013

Trend Alert: Oxblood, Lips and Tips

I have always loved dark red lipstick! And I wear it no matter what, but it seems to really be trending this Fall in a big way! So today I thought I'd share my favorite oxblood inspired lip color. (Just in case this dark red thing is a little intimidating or new for you) I have lots of red lipsticks, but my favorite dark, vampy, "Oxblood" as they are calling it these days, is a MAC, called Viva Glam III. I love it with their Burgundy lip liner. (pencil) My tip for perfect red lips=Always, Always, did I say Always?! Use a liner! In order for red lips to look good (my opinion) you must have a definite line. If not, it tends to fade and/or look sloppy. And because it's darker, it is more noticeable. But don't let that scare you! Red is so fun and daring! But this Oxblood tone is a little less intimidating, a little more muted than a bright red, and a good one to start with if you are hesitant to try red. And it's perfect for Fall. So go ahead and be bold! Wear red!!
Here is a link to the MAC website and my fav dark red color Viva Glam III, they call it a muted brownish/plum toned red and it has a Matte finish (not shiny!) Viva Glam III (Truth be told I love most of the Viva Glam Colors!)
And here is a link to my favorite Burgundy Pencil for lining with the Viva Glam III: MAC, Burgundy Lip Lining Pencil
Here are some looks wearing my fav Viva Glam III:
Wearing it with my fav rock band groupie sweatshirt!

Headed to church!

Hanging with my boy at the farm!

Lounging on the couch with a baby sleeping on my chest.
And for the tips (nails) my favorite color is a Sally Hansen Insta-Dry (because who has time to wait?!) The color is 340/Cinna-snap. I've worn this for years, it's my go to for vampy red nails (or Oxblood if you please.) And you can get it at all the familiar places, Wal-mart, Walgreens, Rite-Aid etc. (and it's cheap!) I don't spend much on polish because with my lifestyle no matter what polish I choose, it doesn't last. So cheap works for me! Here are some pics of the Cinna-snap. Hope this inspires you to try this Oxblood color trend. Have a "Fancy Day!" Much love from "Patch-A-Heaven!"


Monday, November 25, 2013

Adventures of a Stay-at-Home Mom, Skid Steer Tractor Driving Mama!

One of the things I love most about my life...is that it is never dull! There are always challenges and unexpected opportunities to use my "mad ranch-girl skills!" Here is one of those unexpected opportunities, inspired by a phone call I received from "Handy Hubby" the other day. It went something like this: "Handy Hubby", "I have some extra asphalt from the job site today, I'm sending a dump truck your way. Do you think you can go out and spread the pile with the Skid Steer?" "Me: Um...Yeah...Probably." Him: "Or...I could just leave the job and come home and do it." (He must have sensed a little hesitation in my voice which prompted his response!) Me: "No, that would be silly, besides if the truck is already on it's way, the asphalt will be set up before you can get here. I think I can do it." I do have some minor experience running a skid steer loader, but minor experience in making the machine go and getting asphalt spread out and to look good are two different things! And you must understand, yes, I own half of the construction company we call ours, however my half-owner duties generally include accounting, taxes, payroll, HR, PR, gopher-ing and the like. I am more of a support crew. (Yes, I have my own hard hat, yes, it is pink!) My husband on the other hand is the excavator extraordinaire! He is truly gifted at operating heavy equipment (gifted meaning it's like the machine is an extension of his own body, he so naturally makes them do things I never knew were possible, effortlessly and smoothly, and fast too!) So the hesitation I had came from the thought that I knew I could not do as good a job as him, but I knew I could do it. (When I run heavy equipment there's a lot more jerking and stopping and not so much of the previously mentioned  smooth and effortless!!)
To make matters worse asphalt comes hot and easily mold able, today just happens to be the coldest day we have had in a while, so I knew I had to do this somewhat fast! The other dilemma I then realized I had was....what to do with our 2 year old. It would not have been safe to leave him in the house alone and where the weather was so cold, time didn't allow for finding a baby sitter or the asphalt would be set up. So I grabbed boy and we headed outside. The truck driver quickly arrived and I asked him to spread it out as he dumped it as to make it easier to spread. However when he dumped it, it came out in one big steaming pile. (It was already setting up, Ahhh!) The driver said as he pulled away "you'll wanna get right on that!" "Yep, I said." As I was thinking to myself, now get outta here, I sure don't need an audience! As we got into the skid steer and started it up, I looked out the window to see my dog, Bella, a sweet, gentle Australian Shepard look at the steaming pile of asphalt and then look at me. If I could read her mind she would have said "Mom....you sure you can handle this? This is more Dad's thing!" And she was definitely right! But here goes anyway! We had a job to do and we went to it. At least my boy had more faith in me than the dog! He was having a great time, he got mama and a tractor at the same time! (I'm kind of his favorite person in the whole wide world. and this makes me happy!) I went to work, immediately scooping up buckets full of asphalt and then moving it to areas on our driveway that needed to be filled in. Dumping and spreading the asphalt. Then I would go over the area with the bucket to smooth and flatten. I continued until the pile was no more. Did I do it? Yes. Was it as good as "Handy Hubby" would have done? No. But I can fill in when in a pinch! (I had the excuse that I did it with a 2 year old on my lap to use if needed!)  This experience got me thinking that there are a lot of women out there, farmers and ranchers (excavators) wives that are asked to do a lot of things that maybe are stretching their comfort zones just a little (or a lot!) And what admiration I have for such ladies! They have been asked to help doctor sick animals (which don't always appreciate the help and chase them up onto the fence if they were lucky to make it there!), asked to drive big scary trucks or farm machinery (and sometimes end up with a truck load of sheep hanging on for dear life as the truck tires hang over a ledge!),  warm and nurture baby calves (even at the expense of letting them bathe in your personal bath tub!), or sticking her hands into a pigs womb to help deliver baby pigs because the sow couldn't do it herself and her husbands hands were too big. I could go on with stories of how rural women continually step outside of their comfort zones for the sake of their farms, ranches and husbands. I'm happy to say that I belong to that group of women. Today's post is dedicated to all those ladies who aren't afraid to get a little dirty or take on a task that may seem a little scary. Do something everyday that makes you uncomfortable! You will be surprised how liberating it feels and gives you a boost of self confidence.

Here are some pics from our asphalt challenge today:
Bella wondering what I've gotten myself into!

The boy (who needs a haircut!) And his tractor driving mama.

When the boss got home I asked him how I did. He said I did great!

Sunday, November 24, 2013

Recipe Share: Salted Caramel Pretzel Smores


Welcome back to my "Patch-A-Heaven!" Do you love over the top desserts like I do?! I am a total sucker for caramel, chocolate, and all rich, delectable desserts. So much so, that my "Handy Hubby" calls me "Garbage Gut!" Geez, at least I gave him a nice, sweet name! "Garbage gut?!" Well if the shoe fits I suppose! I love my treats! So, today I bring you one of those over the top desserts! I love making caramel marshmallow krispies, this recipe is at the link below if you want to check out my most popular recipe post. (I guess I'm not the only "Garbage Gut" around! Since it is one of my all time most popular blog posts!) I'm glad to be in good, sweet company!
Revival Recipe: Caramel Marshmallow Krispies 

Today's over the top recipe was inspired by this caramel creation. And I love the original graham cracker smores (I mean...who doesn't!) But today I got to thinking that caramel and some saltiness would be a nice addition to the old stand by. So here's what I did. I made my go to caramel recipe. (Which is featured at the link above.) And I smashed up some pretzels and formed them into 5" squares and when the caramel was ready I poured it over the pretzels to completely cover the squares. Then when the caramel set up enough to cut, I cut each 5" square into quarters making smaller squares. Then I melted chocolate and spread a layer onto one of the caramel pretzel squares and sprinkled sea salt onto the chocolate and then toasted a marshmallow. And then you know how the rest goes! (Slap that baby together and enjoy the ooey-gooey goodness!!)


Here are some pics from our gooey creation today:
Caramel is ready! Here I am actually dipping a marshmallow.

Here are the 5" squares ready for the caramel.

Here they are after the caramel.
And here is one cut into quarters.

Here is one of the quarters with chocolate and sea salt.
Toasted Marshmallow.
And the end result! A Salted Caramel Pretzel Smore. Ooey-gooey, crunchy, sweet yet salty goodness. Just don't eat too many or you will be in a sugar coma and the roof of your mouth will yell at you! (it's kind of like Captain Crunch that way!)


Ingredients needed:
Sea Salt
Pretzels
Marshmallows
Chocolate, whatever kind you like. I had Nestle choc chips around so I melted those.
Sweetened Condensed Milk
Milk
Karo Syrup
Brown Sugar
Vanilla
Butter
For directions on how to make the caramel please see the link above.

Happy Sugar Coma People!!


Thursday, November 21, 2013

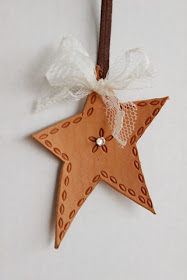
Handmade Cowgirl Country Christmas Tree Series, Episode 1, Leather Star Ornaments, A Tutorial


It's getting to be that time of year. I just love Christmas! And this year I am going to have the tree I
have always wanted and that makes me even more excited!! If you read my last post where I made a Cowgirl Inspired Tree Skirt from Denim Jeans, you know that I have always wanted a "Cowgirl Tree." But I found the commercial ornaments too expensive to justify. So since I have most of the materials, and tools already I thought I would make my own ornaments and decorate the tree I have always wanted! I hope you are as excited about this as I am! I have enlisted some really fun contributors for this project and can't wait to introduce them and their ideas on ornaments to add to my tree.

For the first ornament I chose a leather star. Stars just go with Christmas for me! They signify the night the Savior, Jesus Christ was born. There was a bright star in the sky that led the Wise Men and others to find the baby Jesus. The Shepherds were out amongst the stars tending their herds when an Angel appeared to them and said "Fear not: for, behold, I bring you good tidings of great joy, which shall be unto all people. For unto you is born this day in the city of David a Saviour, which is Christ the Lord." (Luke 2:10-11) Because I know the true meaning of Christmas and what it means I love stars and the bright hope they represent! And because this is a Cowgirl tree, leather and bling was perfect!

So to make these leather star ornaments you will need:
Leather, Tandy Leather is where I got my leather and supplies, it should be a leather that is stampable.
Leather Scissors
Leather Stain and Finisher
Sponge
Mallet
Quartz Slab or other hard surface to work on
Leather Stamping Tools
Spray Bottle with Water
Leather Hole Punch, if you are a Cowgirl you probably already have one out in the tack room of your horse trailer!
Star Template, either draw one yourself or Google Star Template, print out, cut out and use to trace on the leather.
Pen
Leather Lacing
 Embellishments such as beads, conchos, rhinestones and lace.

To begin, assemble all tools and materials. Then use star template, laying it down on the leather and trace around it with a pen. Then use leather cutters/scissors to cut out the star. (I found it worked best to cut the star legs from the outside working in, and line the scissors up so the end of the scissors ends right where you want it and then snip.) Once you have cut out the star completely, then the tooling begins, lay the leather star down right side up on the Quartz Slab, spray with water to wet thoroughly and evenly (don't make water spots and leave or it will end up that way, instead spray and then use finger to spread water evenly if needed) and use the stamping tool of your choice to stamp designs onto the leather. You use the Mallet to firmly hit the top of the tool until a design is indented into the leather. This is the fun part! You can do whatever your creative mind desires! Once stamped you can then leave the leather un-stained and apply Leather Finish to make soft and shiny. Or you can then apply a Stain. I did some natural light leather color and some I stained a darker brown. Tandy Leather had many different colors of stains to choose from if you wanted a specific color scheme. Once stained you need to let it dry before applying the Leather Finish. I used a soft sponge and circular rubbing to apply both. Allow to dry. I made a hole with Leather Punch toward the top of the ornament to be able to hang it. Then you can embellish the ornaments as you wish. I chose to embellish with rhinestones, conchos, and cowgirl themed pendants. I used E6000 to adhere the rhinestones. I used a brown suede looking, leather lacing to go through the hole at the top of the ornaments and tied a knot at the top. Then tied a cream colored lace bow around the bottom near the hole. When attaching conchos I used the hole punch to make a hole then put the concho through.

Here are some pictures to show what I did:


Supplies


Trace the stars onto Leather.

Again do opposite of what is shown here! Line up the end of the scissors with the end point and then snip.


Here is a cut star. Notice how the top of the star is nice and crisp cut and the bottom half kind of straggly? This is when I learned to keep the scissor tip lined up and end right at he end of the line!
Now tooling the star with the stamping tool and mallet.
Tooled/stamped Star.
Add stain now if desired. Leather absorbs the stain better if already moistened with water.
Use Leather Punch smallest hole size to make hole in top of star.

This Star has been stained and hole has been punched.
Use the Lacing Cord to go through the hole to be able to hang up. Tie knot at top. Embellish with anything you like.


I left the lace off of this one to show that these could easily be made for a Cowboy Tree and not so girly!